스프링의 비동기 기술
스프링에서는 비동기 기술을 어떻게 사용할까?
퀴즈 : 비동기로 바꿔보세요
현재 코드는 run() 로그 출력 후 myService.hello()메서드 실행 후 exit 로그 출력됨.
비동기로 바꿔서, 다른 Thread에서 myService 메서드가 작동하도록 해보세요.
@Slf4j
@SpringBootApplication
public class DemoApplication {
    @Component
    public static class MyService {

        public String hello() throws InterruptedException {
            log.info("hello()");
            Thread.sleep(1000);
            return "hello";
        }
    }
    public static void main(String[] args) {
        try(ConfigurableApplicationContext c = SpringApplication.run(DemoApplication.class, args)){

        }
    }
    @Autowired MyService myService;
    @Bean
    ApplicationRunner run() {
        return args -> {
            log.info("run()");
            String res = myService.hello();
            log.info("exit" + res);
        };
    }
}
.
.
정답은 public String hello() 위에 @Async 어노테이션, 클래스 위에 @EnableAsync를 붙여주면 된다는 것! (내부 Spring Container에서는 복잡하게 작동하지만..)
그런데 return 값을 바로 줄 수 없음. 그렇기 때문에 비동기 작업을 받아줄 수 있는 방법 2가지- Future, Callback 이용해서 약간의 수정을 해보자. (https://heekim0719.tistory.com/384 참고)
Future를 사용한 Spring 비동기
Future를 사용하고, Async Object에 담아 리턴한다.Async Object는 Future를 타고 결과 리턴해달라고 요청하는 담당 오브젝트이다.
@Slf4j
@SpringBootApplication
@EnableAsync
public class DemoApplication {
    @Component
    public static class MyService {
        @Async
        public Future<String> hello() throws InterruptedException {
            log.info("hello()");
            Thread.sleep(2000);
            return new AsyncResult<>("hello") ;
        }
    }
    public static void main(String[] args) {
        try(ConfigurableApplicationContext c = SpringApplication.run(DemoApplication.class, args)){

        }
    }
    @Autowired MyService myService;
    @Bean
    ApplicationRunner run() {
        return args -> {
            log.info("run()");
            Future<String> f = myService.hello();
            log.info("exit: " + f.isDone());
            log.info("result: " + f.get());
        };
    }
}
.
- f.get()을 했을 때, 블락킹인데 그럼 옛날엔 어떻게 했나?
두가지 방법을 사용했다고 한다.
- DB에 넣고 isDone() 수행해본 뒤 true일 경우 꺼내본다.
- HTTP 세션에 저장하고 isDone() 수행해본 뒤 true일 경우 꺼내본다.
리스너를 이용한 스프링 비동기
작업 완료 됐으면 리스너로 처리하고 싶을 때 쓰는 방법
ListenableFuture를 이용하고, addCallback 메서드를 넣는다.
장점 : 콜백 걸어놓은 다음 바로 빠져나가도 됨. 알림을 주기때문에!
public class DemoApplication {
    @Component
    public static class MyService {
        @Async
        public ListenableFuture<String> hello() throws InterruptedException {
            log.info("hello()");
            Thread.sleep(2000);
            return new AsyncResult<>("hello") ;
        }
    }
    public static void main(String[] args) {
        try(ConfigurableApplicationContext c = SpringApplication.run(DemoApplication.class, args)){

        }
    }
    @Autowired MyService myService;

    @Bean
    ApplicationRunner run() {
        return args -> {
            log.info("run()");
            ListenableFuture<String> f = myService.hello();
            f.addCallback(s-> System.out.println(s), e-> System.out.println(e.getMessage()));
            log.info("exit");
        };
    }
}
스레드풀 제한걸어 Async 사용하기
@Async 어노테이션은 요청마다 스레드를 생성하기 때문에 실무에서 그냥 사용했다간 큰일난다.
스레드 풀에 갯수를 제한하여 관리할 수 있다.
@Slf4j
@SpringBootApplication
@EnableAsync
public class DemoApplication {
    @Component
    public static class MyService {
        @Async
        public ListenableFuture<String> hello() throws InterruptedException {
            log.info("hello()");
            Thread.sleep(2000);
            return new AsyncResult<>("hello") ;
        }
    }
    public static void main(String[] args) {
        try(ConfigurableApplicationContext c = SpringApplication.run(DemoApplication.class, args)){

        }
    }

    @Bean
    ThreadPoolTaskExecutor tp() {
        ThreadPoolTaskExecutor te = new ThreadPoolTaskExecutor();
        te.setCorePoolSize(10);
        te.setMaxPoolSize(100); // 큐가 꽉 찼을 때 요청이 더 들어가면 생성되는 max갯수
        te.setThreadNamePrefix("myThread");
        te.setQueueCapacity(200);
        te.initialize();
        return te;
    }

    @Autowired MyService myService;

    @Bean
    ApplicationRunner run() {
        return args -> {
            log.info("run()");
            ListenableFuture<String> f = myService.hello();
            f.addCallback(s-> System.out.println(s), e-> System.out.println(e.getMessage()));
            log.info("exit");
        };
    }
}
비동기 서블릿
서블릿 3.0
- 서블릿은 모두 Blocking 기반의 작동. Connection 100개면 Thread 100개 할당
- 서블릿의 기본을 이루고 있는 HTTP request, HTTP response는 InputStream, OutputStream으로 이루어져 있고, 이 내부의 read() 등의 메서드는 모두 Blocking 구조를 갖고 있다.
- HTTP Connection은 이미 논블록킹 IO
서블릿 3.1
- 논블록킹 서블릿 요청, 응답 처리
- Callback
비동기 서블릿 작동 방식
 )
)
(이미지 출처 : https://jongmin92.github.io/2019/03/31/Java/java-async-1/)
간단한 비동기 api
@Slf4j
@SpringBootApplication
@EnableAsync
public class DemoApplication {

    @RestController
    public static class MyController{
        @GetMapping("/callable")
        public Callable<String> async() throws InterruptedException {
            log.info("callable");
            return ()-> {
                //callable 오브젝트에 담아서 바로 리턴할 수 있도록
                log.info("async");
                Thread.sleep(2000);
                return "hello";
            };
        }
    }
    public static void main(String[] args) {
        SpringApplication.run(DemoApplication.class, args);
    }
}
출력로그
2021-02-18 10:07:05.662  INFO 20152 --- [nio-8080-exec-1] o.a.c.c.C.[Tomcat].[localhost].[/]       : Initializing Spring DispatcherServlet 'dispatcherServlet'
2021-02-18 10:07:05.662  INFO 20152 --- [nio-8080-exec-1] o.s.web.servlet.DispatcherServlet        : Initializing Servlet 'dispatcherServlet'
2021-02-18 10:07:05.662  INFO 20152 --- [nio-8080-exec-1] o.s.web.servlet.DispatcherServlet        : Completed initialization in 0 ms
2021-02-18 10:07:05.671  INFO 20152 --- [nio-8080-exec-1] com.example.demo.DemoApplication         : callable
2021-02-18 10:07:05.674 INFO 20152 --- [ task-1] com.example.demo.DemoApplication : async- nio-8080-exec-1가 메서드를 할당받음.
- 다음 처리를 위해 바로 반환된다.
- task-1 스레드가 이어받아 명령을 처리
비동기 Blocking LoadTest
로드테스트 코드
1초에 100개의 요청을 동시에 날리는 코드
@Slf4j
public class LoadTest {
    static AtomicInteger counter = new AtomicInteger(0);
    public static void main(String[] args) throws InterruptedException {
        ExecutorService es = Executors.newFixedThreadPool(100);
        RestTemplate rt = new RestTemplate();
        String url = "http://localhost:8080/callable";

        StopWatch main = new StopWatch();
        main.start();

        for (int i=0;i<100;i++){
            es.execute(()->{
                int idx = counter.addAndGet(1);
                log.info("Thread" + idx);
                StopWatch sw = new StopWatch();
                sw.start();
                rt.getForObject(url, String.class);
                sw.stop();
                log.info("Elapsed: "+idx+" -> "+sw.getTotalTimeSeconds());
            });
        }
        es.shutdown();
        es.awaitTermination(100, TimeUnit.SECONDS);
        main.stop();
        log.info("Total: {}", main.getTotalTimeSeconds());
    }
}
max Thread 수 = 200 일때
2.2초정도 걸린다.
11:30:19.324 [main] INFO com.example.demo.LoadTest - Total: 2.200644999max Thread 수 = 20 (spring.task.execution.pool.core-size=100) 일때
10.2초정도 걸린다.
ps. 토비의봄 8회에서 spring.task.execution.pool.core-size 디폴트값은 100으로 설정되어 있다. java버전이 올라가면서 default가 8개로 설정되어 있어, 위와 같이 core-size도 설정이 필요하다.
11:31:48.901 [main] INFO com.example.demo.LoadTest - Total: 10.203350799max Thread 수 = 20 (spring.task.execution.pool.core-size=100), Callable을 사용했을 때
서블릿 스레드는 바로 리턴하여 다음 작업을 받고, 워커 스레드가 작업을 진행한다.
- 그럼 오히려 서블릿스레드 1개 + 워커 스레드 100개로 101개의 스레드를 사용하기 때문에 스레드를 더 사용하는거 아닌가?
@Slf4j
@SpringBootApplication
@EnableAsync
public class DemoApplication {

    @RestController
    public static class MyController{
        @GetMapping("/callable")
        public Callable<String> callable() throws InterruptedException{
            log.info("callable");
            return () -> {
                log.info("async");
                Thread.sleep(2000);
                return "hello";
            };
        }
    }
    public static void main(String[] args) {
        SpringApplication.run(DemoApplication.class, args);
    }
}
2.2초정도 걸린다.
12:04:42.595 [main] INFO com.example.demo.LoadTest - Total: 2.200521DeferredResult 사용
스프링 비동기 기술의 꽃. Spring3.2부터 사용 가능.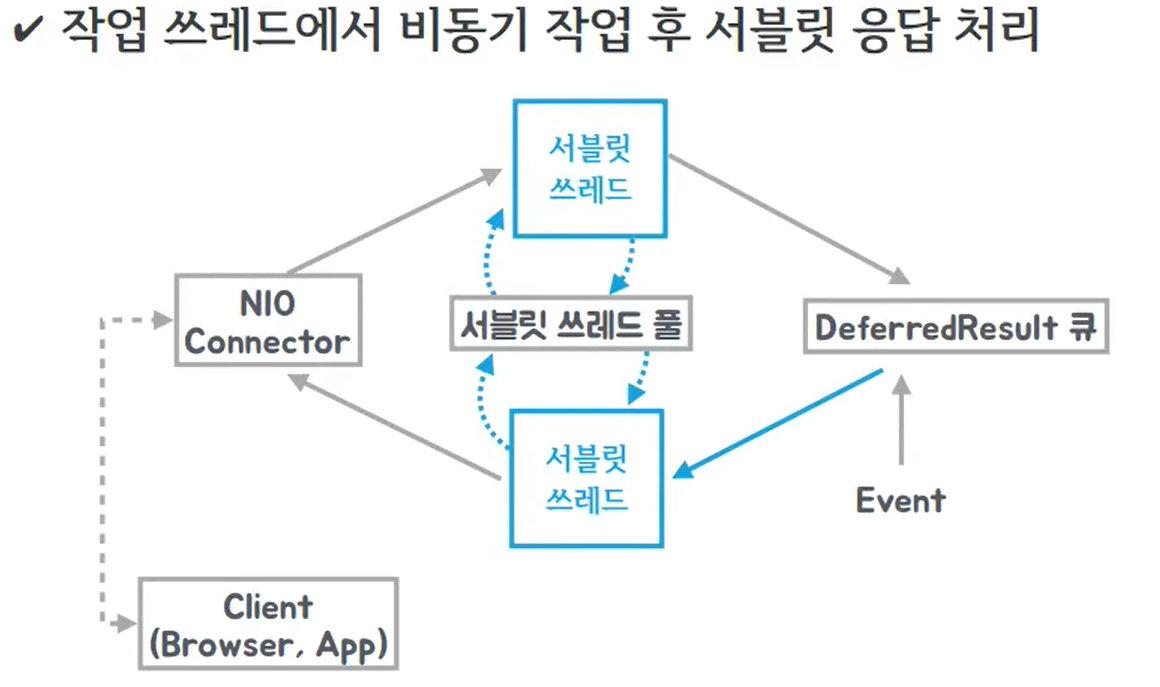 )
)
(이미지출처 : https://www.podo-dev.com/blogs/241)
요청을 보냈는데 작업을 수행하지 않으면 서블릿 스레드는 대기. 외부 이벤트 발생 시 다른 스레드에서 setResult 호출하면 그때 결과를 쏘아줌.
@Slf4j
@SpringBootApplication
@EnableAsync
public class DemoApplication {

    @RestController
    public static class MyController{
        Queue<DeferredResult<String>> results = new ConcurrentLinkedDeque<>(600000L);

        @GetMapping("/dr")
        public DeferredResult<String> callable() throws InterruptedException{
            log.info("dr");
            DeferredResult<String> dr = new DeferredResult<>();
            results.add(dr);
            return dr;
        }
        @GetMapping("/dr/count")
        public String drcount(){
            return String.valueOf(results.size());
        }
        @GetMapping("/dr/event")
        public String drevent(String msg){
            for (DeferredResult<String> dr : results) {
                dr.setResult("Hello" + msg);
                results.remove(dr);
            }
            return "OK";
        }
    }
    public static void main(String[] args) {
        SpringApplication.run(DemoApplication.class, args);
    }
}
즉 코드를 예로 들면,
- localhost:8080/dr 을 요청하면 응답하지 않고 대기상태
- localhost:8080/dr/event 요청 시, OK 출력
- localhost:8080/dr 화면이 "Hello"+msg 로 출력
어디에 쓸까?
- 채팅방에 30명이 요청 날리고, 커넥션 유지한채로 대기
- 한명이 이벤트 요청
- 대기하고 있는 30명에게 메시지를 날림
'Spring' 카테고리의 다른 글
| [Spring] WebFlux - Mono의 동작방식과 block() (0) | 2021.03.01 |
|---|---|
| [Spring] CompletableFuture (0) | 2021.02.28 |
| [Java] 비동기 기초 Future, Callback (0) | 2021.02.10 |
| [Spring] Reactive Programming 리액티브 프로그래밍 - Reactive Steams (2) | 2021.02.10 |
| [Spring] String, Model Object, freemarker 이용한 리턴 (1) | 2020.02.22 |
댓글